Showing posts with label Tutorials. Show all posts

Tuesday, 21 June 2016

What is ChatSim? How To Buy How To Activate How To Use ChatSim

Chatsim I know that a lot of you guys might have heard about it and you may probably be wondering what it is and how you can make use of it. well, this article is for those who are to yet to understand or learn how to make use of Chatsim because in this article we are going to be teaching you guys how you can Activate Chatsim and how to use ChatSim and that is after we might have told what it all about. Chatsim is an international SIM card in its real sense hence not a conventional SIM card. ChatSim is the first of its kind across the globe, basically because it is a data-oriented (It can only be used for data not like other conventional SIMs which can be used for both data and calls). It allows its users to be able to connect their various ChatApps anytime and anywhere without limitation by data charges from services providers.


How To Buy ChatSim?

ChatSim Not Available on Sim Shops and Other Online Websites So You Can Buy it from only Amazon.com and ChatSim.com Links are Given in this paragraph. If you are from India then You Should buy it from ChatSim Website if You are Outside of India Then you can Buy this sim any Platform like Amazon and ChatSim Official Website.

How To Activate ChatSim?

  • First Goto Chatsim.com
  • On the 1.SIM DATA section Type Your Mobile Number and Sim Identifier Number and Coupon Code CAMF9OUT and Click on Next.
how to activate chatsim
  • 2. Your Data Section Signup and Fill Your Orignal/Real Details Like Address, Name, City, State and 1 Id Proof with Address Proof So you Can upload Aadhar Card, Driving Licence etc and click Next.
  • 3. FINISH now your sim are Activated within 5Minutes now you can use your sim for Messaging. enjoy ChatSim.

How To Use ChatSim

For Android Phones

  • Insert ChatSim in your smartphone
  • Enable Data Roaming
    Android: Menu > Settings > Mobile Networks > Data Roaming
  • Set Manual Access Point Name (APN)
    Android: Menu > Settings > Mobile Networks > Access Point Names (APN)
Use The Settings:
  • Name: Harshitpc
  • APN: chatsim
  • APN Type: Default
  • Proxy: Blank
  • Port: Blank
  • Username: Blank
  • Password: Blank

For iPhone Phones

  • Insert ChatSim in your smartphone
  • Enable Data Roaming
    iOS: Menu > Settings > Cellular > Data Roaming
  • Set Access Point Name (APN) Manual
    iOS: Menu > Settings > Cellular > Cellular Data Network
Use The Settings:
  • Name: Harshitpc
  • APN: chatsim
  • APN Type: Default
  • Proxy: Blank
  • Port: Blank
  • Username: Blank
  • Password: Blank

How To Remove Your Credit Card Details From Google Play

Google Play (formerly known as Android Market) is an online store for all your favourite Android apps, games, music, movies, books, and magazines. The market offers both free and paid applications, where purchases can be made using a applicable credit, debit, or gift card and the payments are directed securely through Google Wallet. Perhaps, you must have noticed that Google asks for your Credit Card when making your first purchase from Google Play Store. And the next time you wish to buy an app, it doesn’t asks for the CC because by default it saves your Credit Card credentials during the first checkout without offering any option to continue without saving the card information.


How To Remove Your Credit Card Details From Google Play:

  • Sign in to your account at ‘https://wallet.google.com/manage’ using the same email address that you used to buy apps from Google Play. (This can be done either from your mobile phone or computer).
  • Google Wallet will show all your transactions. Click Payment Methods from the left pane, where your added cards will be listed.
  • Click Delete next to the card information that you’d like to remove. A confirmation message will appear, click ‘Yes, remove it’.
  • You can also Add a new card, update your payment or billing address information using the ‘Edit’ option and set one of the added cards as your default payment method by clicking ‘Set as default’ from the same webpage.

Monday, 6 June 2016

How To Get Google Adsense Approval For Android Games

Google Adsense is #1 ad serving service for every bloggers and web masters to earn decent money with their website. And also Google Adsense available for other products such as videos and Games.
If you are a game developer, You can earn money from Adsense with your game. To apply Google Adsense for games, your game should meet below all below requirements.


Requirements:
  • Your game should have atleast 500,000 users per day
  • It supports Web-based Flash games only
  • Must be technically capable of SDK integration
  • Your game must have 80% traffic from US and UK
  • Content to be Family safe and targeted at users age 13 and up
  • Must be able to report embed destination and have control over where games are distributed.

If your game has all above eligibilities please follow the below steps to apply.

How to apply:

  • Login to your Google adsense account (dont have the account sign-up here)
  • Click on the My ads menu
  • Click Other Products, then click on the "Apply for Adsense for Games" button like below image
  • Then fill out the form with valid details
  • Finally submit to Google adsense
After you have submitted your request Google will analyse your request and inform you with your email. If your request approved, place the adsense ads into your game and earn more.

Friday, 3 June 2016

Create Your Own Working Torrent Leeching Site For Free

Have you ever wanted your own unlimited torrent to direct download link generator. Now you can create your own working torrent leeching for free.


Steps To Make Own Working Torrent Leeching Site

  • First go to -
  • https://github.com/jpillora/cloud-torrent
  • scroll down to the segment which says 
  • Install -> Heroku 
  • Click this button to
  • Now you need to create a heroku account, fill up the form and set language as GO. that's it
  • you can always have http://10minutemail.com/ as your beloved friend
  • verify the account from e-mail
  • now you should see deploy button if not go to the github link and press the heroku button again.
  • Now you should see the app, Leave the optional Field empty and deploy,


After that Launch the app, and Congratulations you have successfully made your own unlimited torrent leech host site.

Tuesday, 31 May 2016

How To Enable Two Step Verification In Linked In [ Step By Step Guide ]

Two step verification system is well known security feature helps to protect your online account from hackers. If you have enabled, they will send verification code to your phone for every time you try to sign in with new device. You have to enter the security code and sign into your account. Even if someone hacks your password he can't able to sign in to your account without phone verification code.


After Twitter and Evernote, LinkedIn also introduces Two-step verification feature to protect users account from being hacked. Do you want to enable 2-step verification system to you account, follow the step-by-step guide to activate two step verification to your LinkedIn account

How To Enable Two-Step Verification In LinedIn:

  • Sign in to your LinkedIn account
  • Go to settings by moving your cursor on your image which is placed top right corner and select Privacy & Settings (or) click on this link
  • Then select Account tab and click Manage Security Settings
  • In two-step verification section click on Turn On link, new window will open
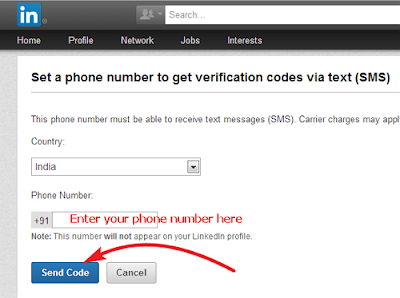
  • Select your country and enter your phone number, which you want to get security code
  • Then click on Send Code button


  • They have sent verification code to your given phone number, note the 6 digit verification code and enter it next window

  • Finally click on the Verify button
That's all you have successfully enabled 2-step verification to your account, next time you try to sign in to your LinkedIn account with new device, it is important to keep your mobile with you.